Operating System
Installation
As base operating system we will be running Debian Stable, which provides a safe, well-maintained, "standard" setup. Debian is unlikely to go anywhere, and the stable release gets updates for a long time (usually 3 years of official support plus 2 of community support).
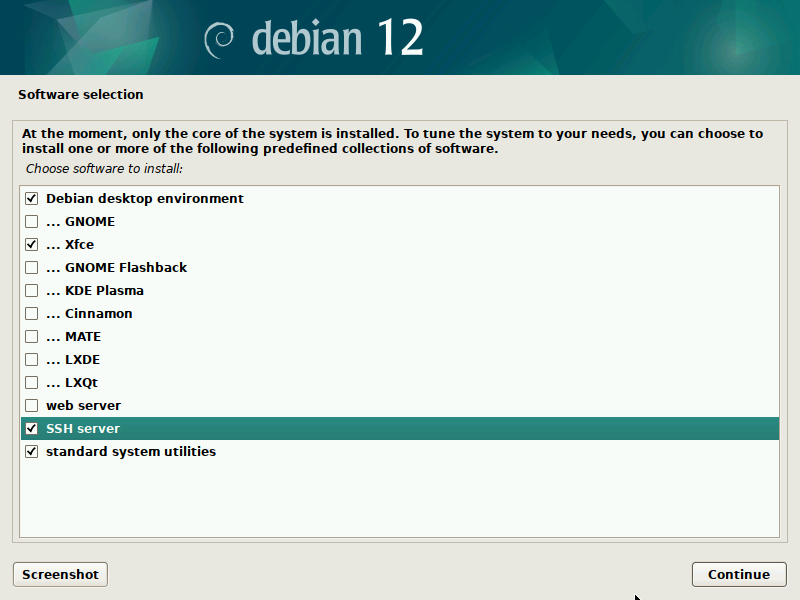
While we will be mostly using this as a server system, it is a good idea to install a user interface, to make some tasks easier or more familiar. In particular, I personally prefer installing the Xfce desktop option, which can be selected during setup. It is stable, well supported, includes all essential tools, and behaves in a familiar way to Linux and Windows users. I also will be installing the SSH server set of packages.
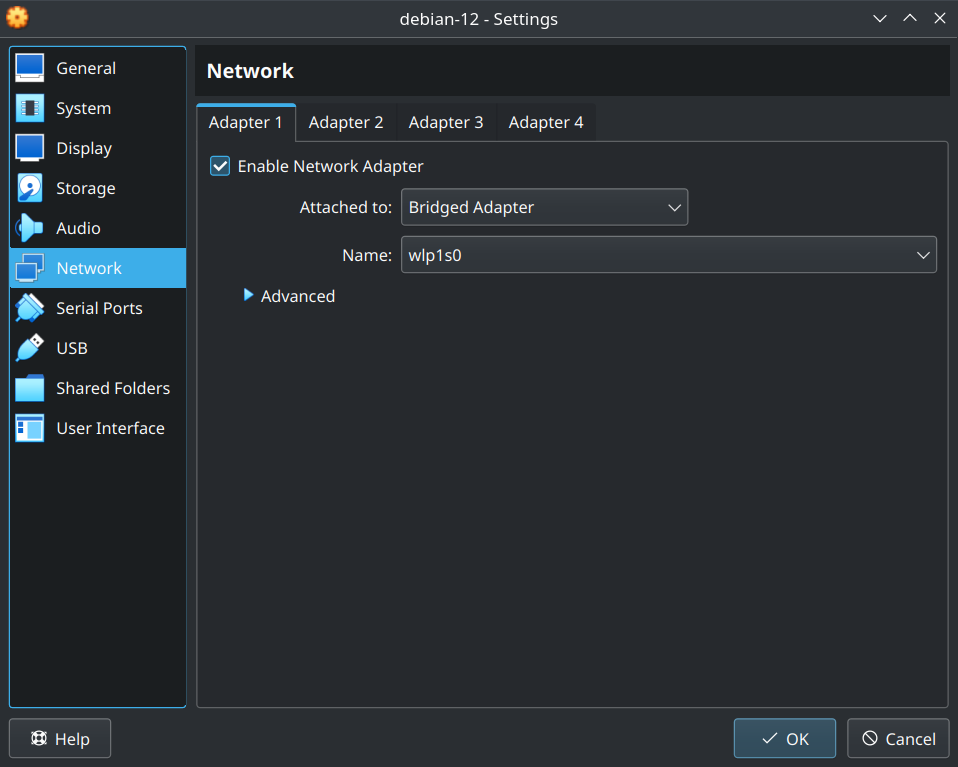
If you want to try following this guide on a virtual machine first, it is crucial that the VM gets an IP assigned by the router directly. In VirtualBox, this can be obtained by setting the network card on "bridged mode", attached to the physical network card used to connect to your router by the host machine.
Disk encryption
TODO: Should be setup during install...("use encrypted LVM"). However, it stops you from recovering from reboot. Could maybe have os unencrypted so it boots, and then require ssh + password to unencrypt and enable services on docker. Realistically, useful only if your threat model includes the server being seized.
Initial configuration
We will now proceed to prepare the initial configuration to run our server. I will be assuming that you are logged into the system as normal user <username>.
Configure sudo
The sudo command lets you execute commands that modify system files. While it is installed by default, it is not automatically enabled for the user created during setup. To enable this, one needs to add <username>; to the sudo group by executing the following commands:
$ su -  # will ask for the root password
# usermod -aG sudo <username>
After the commands were run, log out and log in to the user session to enable the changes.
Install docker
The Docker engine is often available in linux repositories, but this is often not the best way to install it, due to these packages often being outdated. Instead, we suggest checking the latest instructions for your operating system on the official documentation.
For Debian Stable, as of 2023 the instructions point to installing the .deb file for Docker Desktop. We however suggest following the second recommended approach, "install Docker Engine from Docker's apt repository", as it results in a smaller installation of just core components, without the wrappers implied by the Docker Desktop product. follow the (currently three steps) that result in successfully running
sudo docker run hello-world
Install haproxy
This will be our reverse proxy (see Networking section). To install, run the following command
sudo apt install haproxy
Software updates
To keep your operating system up to date, periodically run the following commands.
sudo apt update
sudo apt upgrade
sudo snap refresh
If during the update a new version of the linux kernel was installed, you are recommended to reboot the server using the sudo reboot command.
The last command forces an update of Snap packages, which in our case means Certbot. While Snap packages should be automatically updated, they are not if the package is running at the time the update is scheduled. Since I'm unsure about Certbot's behaviour, it may be a good idea to periodically force an update.
Configure automatic software updates
TODO: Currently, we don't have an official recommendation or guide. We point you instead to the official Debian documentation for Unattended Upgrades.
Power management
In this section we cover a selection of power management issues that can be potentially found when self-hosting services from somewhere at home.
Keep laptop powered even when closing the lid
An old laptop can be a great small self-hosting server. Personally, I run my services on an older Thinkpad, that I keep close and upside down (so that the fans below the laptop can dissipate temperature the best). Crucially, this is possible by stopping the operating system from going to sleep/hibernation when the lid is closed.
On Debian 12, this can be achieved in a few different ways listed in the official documentation.
We adapt this, and achieve it by modifying cat /etc/systemd/sleep.conf so that the following options are uncommented and set to no:
[Sleep]
AllowSuspend=no
AllowHibernation=no
AllowSuspendThenHibernate=no
AllowHybridSleep=no
Enable Wake-On-Lan if connected via ethernet
TODO: A possibly useful feature to enable is Wake-On-Lan. This requires configuring at least the router, BIOS and operating system, and is not covered in this guide. For Debian, some documentation is available here.
Recover after a blackout
TODO: Recovery after a blackout is not covered by this guide. Wake-On-Lan could be part of it, or some other physical device that turns on the computer when electricity is available. Potentially some motherboards could have support for that (?).
Remote access
Configuring remote access to the operating system (and not just the services hosted) is crucial when self-hosting. Somehow emergencies and bugs always seem to happen when you are away travelling, and having access to the operating system is crucial in these scenarios.
Configure SSH access
SSH is the most commonly used secure remote shell software available. During installation we have selected to install the SSH server automatically. We now need to configure it to accept connections from a client.
The following section is taken from the tutorial hosted in the Debian documentation.
Client configuration
The first step is generating SSH keys for your client. Depending on your operating system instructions to install the client software will differ. There's plenty of articles online, so we refer you to finding one.
Once the client software is installed, generate a public/private key pair by running
ssh-keygen
While there are many parameters that can be used for generating keys, investigating those is not the point of this article. We will therefore assume the SSH default options.
Note down the location where the keys will be saved (communicated to you)
by ssh-keygen. On a Debian client, these are located at /home/<username>/.ssh.
You may want to set a "passphrase" for the keys. This is a password that needs to be inserted every time an SSH connection using these keys is performed, and protects you from someone stealing your identity by getting a copy of your "private key".
This will result in two files being stored in the directory mentioned above:
- id_rsa (or id_ed25519), a "private key" used to authenticate with the server, this file should not be shared or lost.
- id_rsa.pub (or id_ed25519.pub), a "public key" used by the server to authenticate you. We will need to transfer these to the server.
Server configuration
We will here assume that you have physical access to your server. If not, you will need to use ssh-copy-id to copy your key to the server. See the specific instructions in the Debian documentation.
Alternatively, this can be performed manually by copying the public key into a pendrive, and appending its content to the /home/<username>/.ssh/authorized_keys text file on the server.
If such file doesn't exist, create it by running the following commands in your terminal
touch ~/.ssh/authorized_keys
chmod 600 ~/.ssh/authorized_keys
TODO: sshd_config and instructions to first log in by port-forwarding
Configure Mosh access
Mosh is a tool for connecting to remote servers via SSH over unstable connections (such as over a mobile network). Mosh can also be useful over stable networks, whenever the client device is likely to be put in standby, since it allows to keep the connection alive when the device is taken out of standby.
The following steps should result in a correct Mosh setup.
- Set up router port forwarding of the UDP range 60000-61000 to your server
- On the server, run
sudo apt install mosh - On the server, run
mosh-server. If it doesn't complain, great. Skip to the "reboot your server" step. Likely, it will complain about being unable to set some locale. Assuming it wantsen_US.UTF-8for the sake of an example, add to~/.bashrcthe following two lines at the end of the file
export LC_CTYPE=en_US.UTF-8
export LC_ALL=en_US.UTF-8
- Run
sudo dpkg-reconfigure localesand make sure that the desired locale is enabled. - Run
bashto reload locales, and runmosh-serveron the new bash session. Hopefully it doesn't complain anymore. - Reboot your server (to make sure everything automagically works).
- Install mosh on your client device, and try connecting to your server using
moshinstead ofssh. It may still complain about locales if your client is lacking them. See your OSs guide about how to deal with it (sudo dpkg-reconfigure localesshould do the trick if your OS is Debian-based) - Enjoy a more flexible remote shell! It is recommended that you use
screen,tmux,byobuor equivalent on the server, to make sure your sessions stay alive acrossmoshsessions.
Configure Byobu
A useful tool for remote access are detachable terminals. You may already be comfortable using screen or tmux, in which case you can safely skip this section.
If you are unfamiliar with this tool, a beginner-friendly alternative is byobu.
Install byobu by running
sudo apt install byobu
Whenever you log into the server via SSH or Mosh, run the byobu command, to enter the virtual terminal. Inside this environment, you can create new "windows" by pressing F2, and navigate to the windows to the right and left by pressing respectively F4 and F3.
Whenever you want to disconnect, but keep the processes in the virtual environment running in the background, press F6. You can now disconnect from the server. Next time you reconnect, you can pick up your session where you left it, by running byobu again.
A full list of byobu key-bindings can be found on the official documentation.
Automatically running tasks with cron
TODO: explain how to use cron -e and cron -l Mention that this may be useful in general, and appears elsewhere in the guide
sudo crontab -u root -e
sudo crontab -u root -l
External drives
If you have a large media library that you want to expose to the internet, it may be interesting to keep it in an external device that can be attached on boot of the machine.
Traditionally, the commong approach would be to mount devices on fixed mountpoints via the /etc/fstab file.
This works well for internal devices, since they automatically mount at boot, but less so for external devices such as an external USB hard drive. Indeed, if the connection in the latter has a chance of failure (say, your server is an old laptop with USB ports that received some use), I would recommend against using /etc/fstab. While it may work most times on reboot, it will likely fail just when you are away on holiday and result in an un-bootable device that cannot be fixed unless someone manually adjusts the connection or changes fstab, since SSH would not be available.
Personally, I use as external media an SD card, which I mount using cron. This guarantees that if the connection and SD card are working, the device will be mounted shortly after boot, but that if they aren't, boot won't be interrupted and only services accessing the external media will be impacted.
As an example, imagine your external device is /dev/mmcblk0p1. You can find this name by running sudo fdisk -l before and after attaching the device to your machine, and checking what new device appeared on the list.
Say you want to have it appear unter the path /mnt/data, where you would like to store your music collection.
- First, make sure that
/mnt/datadoes not already exist and is not already being used for other purposes. If it is, chose a different path for your external device. - Then, create the path. If it's ketp under
/mnt, you will need root privileges:sudo mkdir -p /mnt/data - Adjust permissions so that your user can read and write to the path, by changing ownership:
sudo chown -R <username>:<username> /mnt/data - Save the following script to
/opt/mountdata.sh(eg.sudo nano /opt/mountdata.sh, copy the contents by shift-ctrl-v, then save with ctrl-s or with ctrl-o followed by enter and exit with ctrl-x). The script checks if/mnt/datais mounted, and if not, attempts to mount the external device to it.
#!/bin/sh

DEVICE=/dev/mmcblk0p1
MNTPT=/mnt/data

mountpoint -q $MNTPT
if [ $? != 0 ]
then
  mount $DEVICE $MNTPT
else
  : "mounted"
fi
- Add the above script to the root user's crontab, to be run with a relatively high frequency. Personally, I use the following cron entry (note, since we have not flagged the script as executable,
/bin/shis required for the task to run):
*/5 * * * * /bin/sh /opt/mountdata.sh >> /dev/null 2>&1