Networking
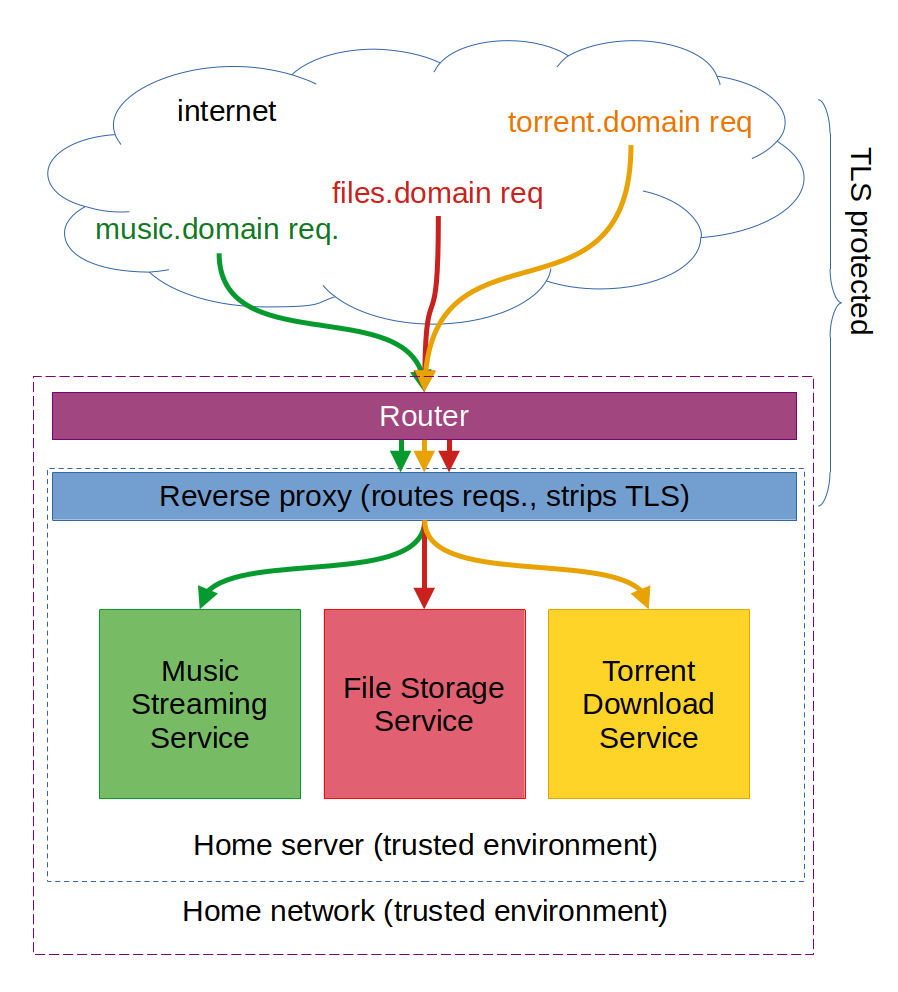
From the point of view of your self-hosted services, your home network will consist of your router and your server. Requests to your web services will arrive TLS-encrypted from the internet to your router (most likely mainly on port 443), which will redirect them to your server.
On the latter, a piece of software known as a "reverse proxy" will dispatch every request to the appropriate application container, which will ultimately be running each service in a compartamentalised manner.
To address different services from the internet, we will be registering different domains/subdomains, and assign each to a different service. this will let your reverse proxy differentiate requests made to different services, while resulting in a relatively easy setup.
An example overview of the system for a server hosting three different services can be seen in the following figure.
Router
Configuring a router to send all inbound traffic on a specific port to a specific device on the home network is usually referred to as "port forwarding".
For your router to reliably redirect all inbound requests on given ports to your machine, even after possible reboots or power outages, we will require your machine to get a fixed ip address within your home network. Most routers let you configure this, however the specific instructions vary from router to router. Instructions for various makes of router can be found in this article.
Similarly, different models require different steps to configure port forwarding. Instructions for various models can be found in this article.
Which ports you want to open to the internet varies with your needs. Personally, I open three ports:
- Port 80: receives plain unencrypted HTTP requests. We will set this up to automatically redirect the browser to open a TLS-encrypted connection instead.
- Port 443: receives TLS-encrypted requests. This is where most of the communication will likely happen.
- Port 22: receives SSH requests to remote-control your computer. Potentially it could be a good idea to not open port 22 instead, but rather a different one on your router, and have the SSH server listen on that one, to avoid getting flagged by automatic scanners looking for unprotected SSH servers.
Having an SSH server running will let you manage updates/fix issues with the setup when you are not at home. Although I have written to open 22, it has happened to me once to get a lot of traffic into port 22 from some unknown password-guessing bot, which consumed a lot of bandwidth with "wrong password" messages being sent back. It could alternatively be a good idea to run your ssh server on a different port, so that cheap bots don't find you.
Modern routers may ask whether you want to redirect only IPv4 traffic, only IPv6 traffic, or both. Personally, I still only use IPv4 traffic, however this should not make a difference as long as IPv4 is included.
Wired versus wireless connection to the router
TODO
wireless:
+ locate the server anywhere with good connection
- slower data transfer
- no Wake-On-Lan
- requires extra configuration to have the server connect automatically to the network on reboot
Automatically (re)connecting to Wi-Fi
Say you have your host machine connected to the internet via Wi-Fi, and the connection happens to drop. By default, Debian will make no effort to reconnect, and your server will stay unreachable until manually reconnected.
To address this, we create a script /opt/checkwifi.sh with the following content.
#!/bin/sh

# This script is inspired by the following three sources
# https://raspberrypi.stackexchange.com/a/113774
# https://askubuntu.com/a/1228914
# https://wiki.archlinux.org/title/NetworkManager#nmcli_examples
ROUTER_IP=<router ip>
DEVICE=<wifi card device name>
ping -c4 $ROUTER_IP > /dev/null
if [ $? != 0 ]
then
  # nmcli alone seems to work, but resetting the device first sounds reasonable
  echo "No network connection, restarting $DEVICE"
  ip link set $DEVICE down
  sleep 3
  ip link set $DEVICE up
  sleep 3
  # it appears to need the password passed explicitly, unless you first apply
  # the change proposed in https://askubuntu.com/a/1228914
  nmcli device wifi connect "<SSID>"
  # nmcli device wifi connect "<SSID>" password "<password>"
fi
We run this periodically using the following crontab entry for the root user:
*/5 * * * * /bin/sh /opt/checkwifi.sh >> /dev/null 2>&1
For the script to run without having to harcode the password to the connection, one first needs to:
- maually connect using the desktop network manager at least once,
- apply the change to /etc/NetworkManager/NetworkManager.conf mentioned here
[device]
wifi.scan-rand-mac-address=no
- restart the network manager service:
sudo systemctl restart NetworkManager
Alternatively, it is possible to pass the password explicitly to nmcli, to realise the connection.
Domain names
You may want to get a domain name you can use for your server. Personally, I use a different subdomain for every application I run, with the reverse proxy identifying the application based on the domain. There may be other ways of routing this, I just have not looked into this.
To start setting up your domains, you will need to know the IP address of your router. This can be found by navigating to #################
TODO: complete instructions
Free option: FreeDNS
An option for free DNS without too many limitations (up to five on the free account at least) is https://freedns.afraid.org. They give you more or less unlimited DNS, with the only requirement that you refresh the subscription frequently enough. This can be done by having a cron script (that they themselves give you) to refresh the subscription.
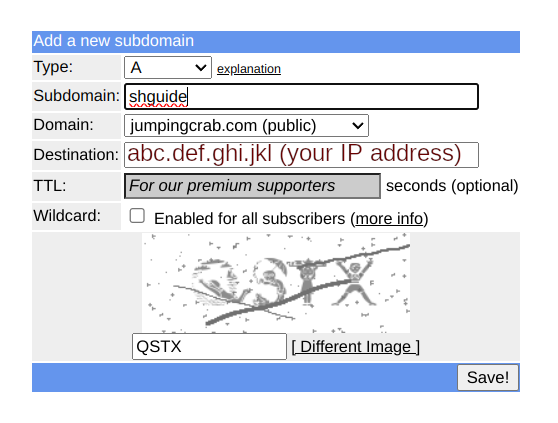
After registration, in order to create a subdomain, navigate to Subdomains. As an example, in this guide we will setup a domain name shguide.jumpingcrab.com. To point it to your router, enter your IP address as "Destination".
In order to automatically refresh the subscription for the domain and make sure that the domain is pointing to your current IP address (in case this changes due to a rebooted router, for example), we will set up a cron script, that your operating system will automatically run at fixed intervals. Navigate to [Dynamic DNS] and select "quick cron example".
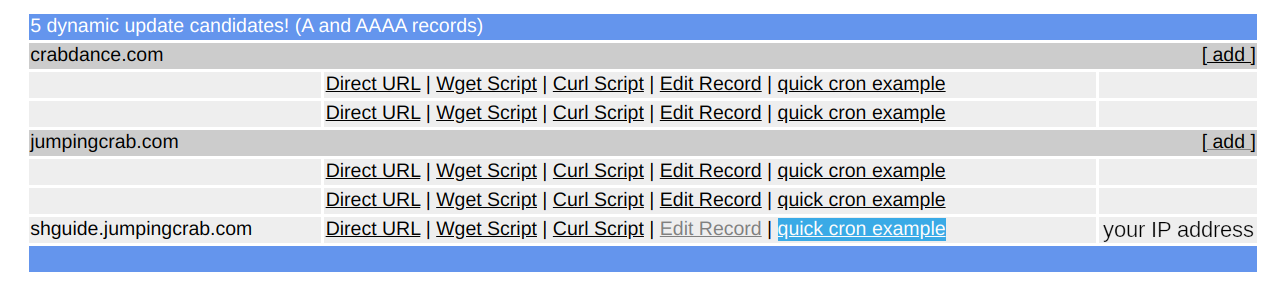
The linked text file has instructions for installing it on most systems. Follow this to set the refresh up.
Free option: DuckDNS
Another dynamic DNS provider is DuckDNS. Personally I don't have experience with them, but they appear to also be a relatively straightforward provider.
Paid option
Not sure I will be covering paid options. It should be noted that as long as you can register type A domain records, the steps should likely not massively differ from those above. The main difference would be that instead of a preallocated domain name, such as "jumpingcrab.com", you will get to choose your own. You could then specify multiple subdomains as above.
Keep in mind that in this case the domain uniquely identifies you, and due to certificate transparency other parties may be able to see what subdomains you registered, hence finding a pointer to your self-hosted services.
Setting the DNS to always point to your current IP may also be harder, if the domain registrar does not offer such a service.
Reverse proxy
During the initial OS configuration, we have installed the reverse proxy software, Haproxy. This is relatively easy to configure for a basic setup, and we will be doing this now.
By default, haproxy comes with a configuration file hosted in /etc/haproxy/haproxy.cfg that should look something likes this:
global
    log /dev/log    local0
    log /dev/log    local1 notice
    chroot /var/lib/haproxy
    stats socket /run/haproxy/admin.sock mode 660 level admin
    stats timeout 30s
    user haproxy
    group haproxy
    daemon

    # Default SSL material locations
    ca-base /etc/ssl/certs
    crt-base /etc/ssl/private

    # See: https://ssl-config.mozilla.org/#server=haproxy&server-version=2.0.3&config=intermediate
        ssl-default-bind-ciphers ECDHE-ECDSA-AES128-GCM-SHA256:ECDHE-RSA-AES128-GCM-SHA256:ECDHE-ECDSA-AES256-GCM-SHA384:ECDHE-RSA-AES256-GCM-SHA384:ECDHE-ECDSA-CHACHA20-POLY1305:ECDHE-RSA-CHACHA20-POLY1305:DHE-RSA-AES128-GCM-SHA256:DHE-RSA-AES256-GCM-SHA384
        ssl-default-bind-ciphersuites TLS_AES_128_GCM_SHA256:TLS_AES_256_GCM_SHA384:TLS_CHACHA20_POLY1305_SHA256
        ssl-default-bind-options ssl-min-ver TLSv1.2 no-tls-tickets

defaults
    log global
    mode    http
    option  httplog
    option  dontlognull
        timeout connect 5000
        timeout client  50000
        timeout server  50000
    errorfile 400 /etc/haproxy/errors/400.http
    errorfile 403 /etc/haproxy/errors/403.http
    errorfile 408 /etc/haproxy/errors/408.http
    errorfile 500 /etc/haproxy/errors/500.http
    errorfile 502 /etc/haproxy/errors/502.http
    errorfile 503 /etc/haproxy/errors/503.http
    errorfile 504 /etc/haproxy/errors/504.http
This specifies some basic configurations, including TLS options (such as rejecting anything older than TLS 1.2, and what ciphers to use).
To configure the required rerouting for our self-hosted services, we will be adding a "frontend" that specifies how to rerout incoming connections on ports 80 and 443 towards local ports where our services will be listening.
To add a basic frontend, append to /etc/haproxy/haproxy.cfg the following text (this can be done by running sudo mousepad /etc/haproxy/haproxy.cfg into a terminal):
frontend homeserver
   bind *:80
   bind *:443 ssl crt /etc/ssl/shguide.jumpingcrab.com/haproxy.pem
   redirect scheme https code 301 if !{ ssl_fc }
   # stats uri /haproxy?stats
   use_backend shguide_backend if { ssl_fc_sni shguide.jumpingcrab.com }
   default_backend empty_backend

backend empty_backend
    server empty 127.0.0.1:9999

backend shguide_backend
    server shguide 127.0.0.1:8083
We now explain what these settings do:
bind *:80causes haproxy to listen to connections arriving on port 80 (hence unencrypted) from all addresses (*), and to treat them using the rules in this "frontend".bind *:443 ssl crt /etc/ssl/shguide.jumpingcrab.com/haproxy.pemcauses haproxy to listen to connections arriving on port 443 (hence TLS-encrypted) from any IP address and to treat them using the rules in this frontend. Furthermore it specifies the path to one TLS certificate to be offered to clients connecting. This file does not yet exist, but we will be creating it in the next section.redirect scheme https code 301 if !{ ssl_fc }redirects unencrypted requests arriving on port 80 to port 443, to force them to use TLS encryption.# stats uri /haproxy?statsdisables the path corresponding tohttps://your-domain-or-ip/haproxy?statsthat would otherwise publicly return statistics about haproxy.use_backend shguide_backend if { ssl_fc_sni shguide.jumpingcrab.com }redirects connections arriving to the "shguide.jumpingcrab.com" domain to the "shguide_backend", a configuration block that specifies on what IP address and port in your local network the corresponding service is listening.default_backend empty_backendspecifies where to redirect connections arriving not on any of the domains specified above. In our case we will specified a "backend" pointing to an unused port, so that such requests fail.- The remaining two blocks specify the "backends" referred to above.
Haproxy will already be running on your server, using the prior configuration file. Once these changes were made to the haproxy configuration file, we ask it to "reload" its configuration, hence acknowleging the changes we made, and check that the reload was successful. If not, this likely means that a syntax error was introduced into the configuration file.
sudo systemctl reload haproxy
sudo systemctl status haproxy
TLS Configuration
TODO: What settings should we recommend?
TLS Certificates
We'll be requesting and setting up TLS certificates from Let's Encrypt for our domain name shguide.jumpingcrab.com. This is not the only way to do it, but it is the way it works for me.
Start by installing the EFF Certbot utility from https://certbot.eff.org. The official website has instructions for installing the utility here. You could follow these fully and get a certificate, however I find that the default process recommended makes it hard to manage when you are running multiple domains on the same server behind an already-running reverse proxy using haproxy, as I personally do. So after installing the certbot command, I stop following the instructions and replace them with the following bash commands (which are just a special case of their certonly request).
To simplify exposiion, I report here the instructions from the Certbot website that result in only installing the client:
sudo apt install snapd
sudo snap install --classic certbot
sudo ln -s /snap/bin/certbot /usr/bin/certbot
After installing the certbot utility, I run the following bash commands for every service/domain I add to my server.
DOMAIN=shguide.jumpingcrab.com
sudo mkdir -p /etc/ssl/$DOMAIN
sudo certbot certonly --standalone --pre-hook "service haproxy stop" --post-hook "cat /etc/letsencrypt/live/$DOMAIN/fullchain.pem /etc/letsencrypt/live/$DOMAIN/privkey.pem > /etc/ssl/$DOMAIN/haproxy.pem && service haproxy start"
These commands set the domain name for which we are requesting the certificate, create a directory inside of /etc/ssl to store the certificate, then runs a certbot command that will temporarily stop haproxy, negotiate with the Let's Encrypt servers to get the certificate, concatenate the resulting files into a file that harpoxy expects, and finally restarts haproxy.
Certbot should take care of renewing the certificates automatically as they approach expiration.
During the certbot request, Let's Encrypt will ask you for your contact details. While I believe you are free not to give them, doing so enables reminder emails that remind you to renew the certificates in case certbot is not running, for example if your server goes offline for a few months. If such a case were to happen, run the following command to force-renew the certificates requested by certbot:
sudo certbot renew